What is the Montessori Three Period Lesson and How to Use
Montessori teachers use many different methods to help children learn. More than just pretty materials on shelves, Montessori is also a style of teaching and learning. One popular lesson Montessori teachers use is the three-period lesson. Teachers and parents can use this versatile lesson in many different situations.
If you’re starting your Montessori teacher training journey, this guide will provide a helpful overview of the three-period lesson. Parents can also benefit from learning about this teaching style. Read on to learn what the three-period lesson is, the steps involved, and when to use it.
The Origins of the Three Period Lesson
The three-period lesson was first developed by Édouard Séguin. A French physician, Séguin worked with children with intellectual disabilities. He created the first private school for children with intellectual disabilities in Paris. Later, he created and ran schools in the United States. Many of his methods focused on helping children become more independent. In addition to creating the three-period lesson, Séguin also made learning materials to help children learn numbers. His work had a big influence on Dr. Montessori.
Later, Dr. Montessori used the three-period lesson in her work with children. Upon seeing how successful it was, she made this lesson an important part of her curriculum for preschoolers and kindergarteners. She wrote about the three-period lesson in her book, Dr. Montessori’s Own Handbook. Today, Montessori courses continue to teach the three-period lesson as an essential tool for learning.
The Three-Period Lesson
The three-period lesson offers a simple way to teach children new vocabulary. Also useful for teaching concepts, the three-period lesson completes the learning cycle. Not only does it present new information, but it ensures the student understands and retains it. During the lesson, teachers can gauge how much information children are absorbing. Then, teachers can use each stage of the lesson multiple times to ensure students master the content.
How does the three-period lesson and what are the three periods?
Period 1: Show and Name
In the first period, the teacher introduces the new information. To do this, the teacher shows the child the object or image and names it. The example Dr. Montessori gave in her book, Dr. Montessori’s Own Handbook, is showing the difference between “thick” and “thin.” In this case, the teacher would show the thinnest and thickest prism from the brown stair or broad stair material. The brown stair is a series of prisms, all the same length and color, that vary only in thickness.
As the teacher, you might say “This is thick. Thick.” while showing the child the thickest prism. Then, you could say, “This is thin. Thin.” while showing the child the thinnest prism. Encourage the child to repeat the words after you.
You can also use this lesson to teach shapes, colors, letters, and more. It’s usually best to start by teaching only two to three new words or ideas at a time. As the child masters the words and concepts, you can add more words.
Period 2: Show Me
This stage tests recognition. To do it, you ask the child to point to or give you the object or image. For example, “Give me the thick one,” or “Show me the thin one.”
During this period, it’s important to observe whether the child can recognize the objects or images correctly. If the child struggles during this period, you can return to the first period and practice the words again.
This period can last as long as necessary. You can even make it more interesting by moving the objects across the room. Then, you can say, “Go find the thick one,” or “Go find the thin one.”
Period 3: What is this?
This stage of the lesson works on recall. Instead of recognizing the object or image, children need to say the word.
You can test the child’s knowledge by showing them an object or image and asking, “What is this?”
In the example of the brown stair, you might hand the child the thickest prism and ask, “What is this?” The child should respond, “Thick.”
You can switch between the periods of the lesson as needed. For example, if the child struggles with the third period of the lesson, you can go back to period 2 or period 1 to refresh their memory.
In Dr. Montessori’s Own Handbook, Montessori explains that you can also ask children about variations of words. For example, you can lay out all of the brown stair prisms. Then, you can ask the child to show you the thickest piece or the thinnest piece.

When to Use the Three-Period Lesson in the Montessori Classroom
The three-period lesson is useful in many different situations. From teaching English as a second language to teaching a foreign language, or teaching new ideas, you can use the three-period lesson for nearly anything. Here are a few examples of how and when to use the three-period lesson in the Montessori classroom:
Sensory Studies
One of the main areas where Montessori teachers use the three-period lesson is to teach sensory concepts. Here are a few sensory concepts you can teach using the three-period lesson:
- Colors
- Shades of color such as light and dark
- Texture
- Temperature
- Size
- Shapes
There are Montessori materials that help teach each of the above concepts. Montessori teachers often use the three-period lesson with Montessori materials.
Letters and Numbers
Montessori teachers often use the three-period lesson to teach three letters at a time. Teachers present each letter phonetically, as a sound. Similarly, you can use this lesson to teach numbers. In the Montessori classroom, teachers usually perform this lesson using sandpaper letters and numbers.
New Words
You can also use the three-period lesson to teach new words. For example, you might teach children the name of different insects using plastic models. Children can learn the difference between a fly, an ant, and a beetle. Or, you can use this lesson to teach a new language. From simple classroom objects like pencils and crayons, to clothes, it’s a practical way to learn the names of items in a new language.
The Three Part Cards (Nomenclature Cards)
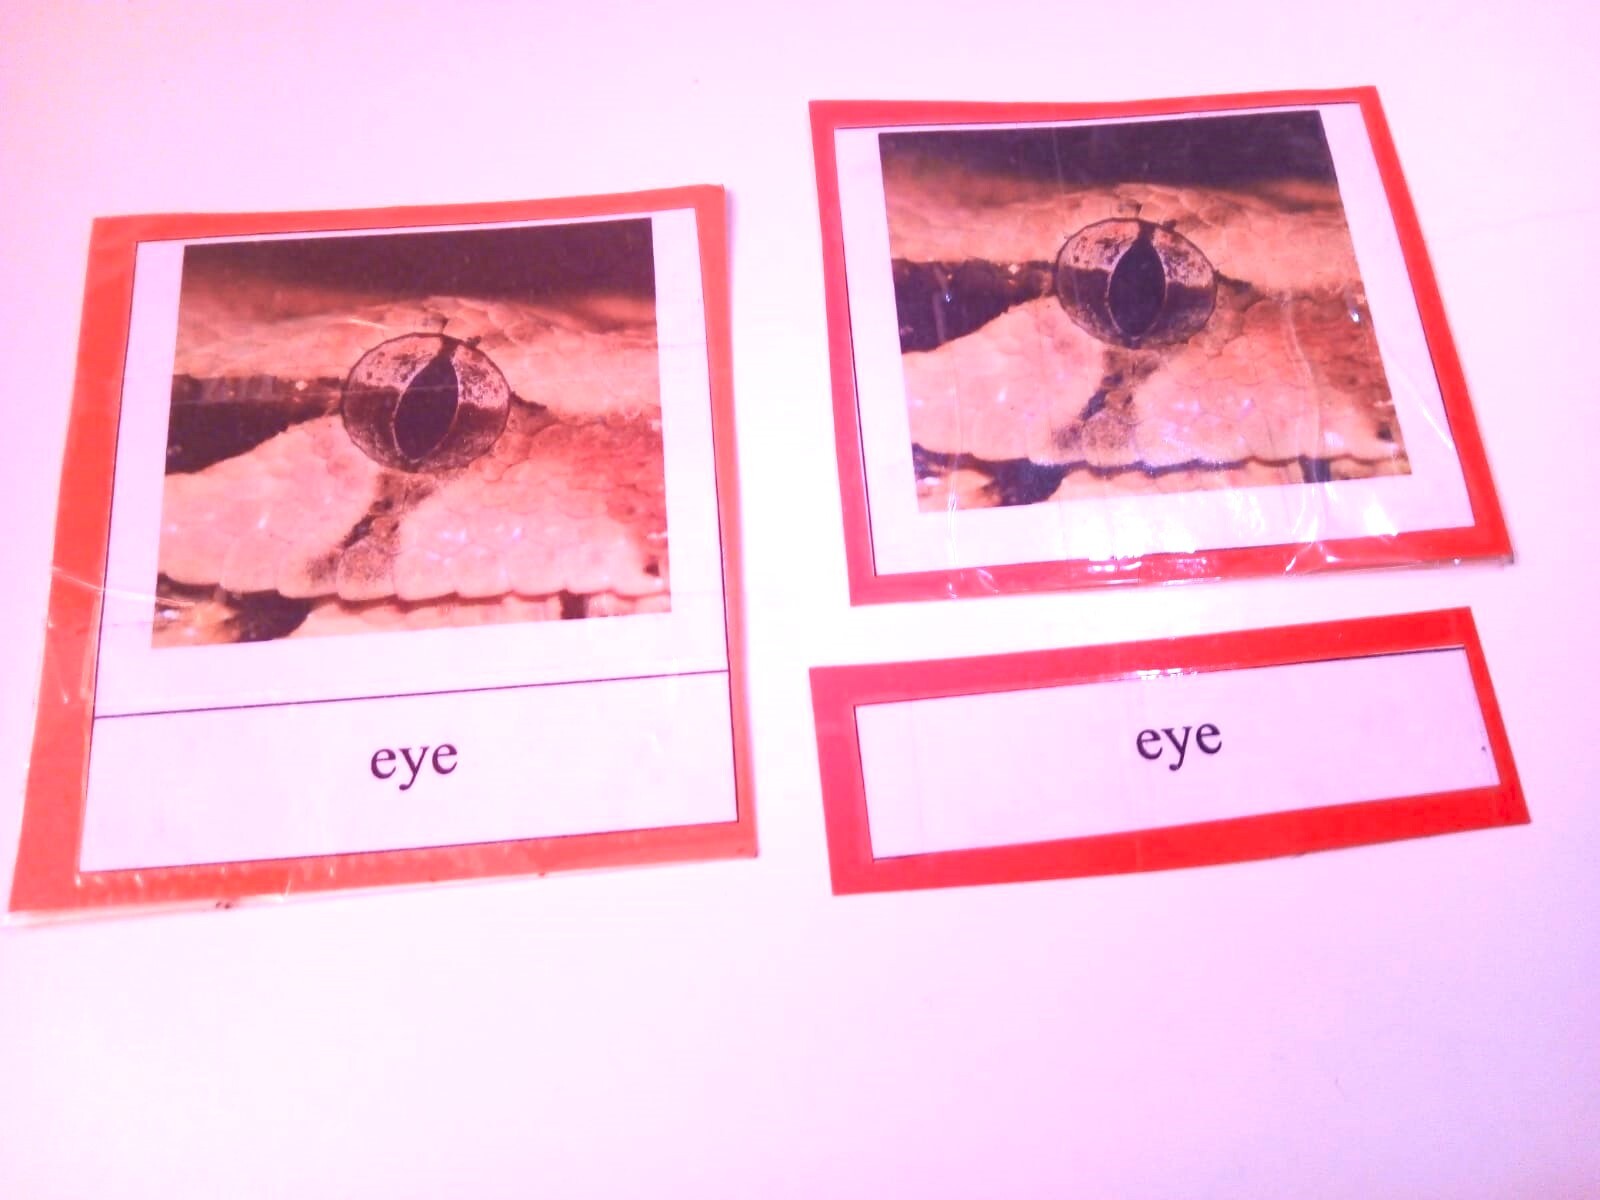
Montessori used three-part cards or nomenclature cards alongside the three-period lesson. What are these cards? Three-part cards highlight new words and ideas, often in science. For example, three-part cards might show the parts of a bird, different geographic formations, and more. The parts of three-part cards are: an illustration, the label, and the control card. Some sets of cards also include a definition card.
Teachers usually introduce the cards using the control cards that include the illustration and label. In another lesson, the teacher may use the illustration cards on their own. As part of the presentation, the teacher may use the three-period lesson. Then, the teacher may prompt the child to match the labels to the images as another way to practice the second and third periods of the lesson.
Practicing the Three-Period Lesson in Montessori Teacher Training
The three-period lesson may seem straight forward. Yet, it takes some practice to master it! Also, teachers need experience using the three-period lesson with children. That way, teachers can learn to recognize the signs that a child needs to repeat one of the periods in the lesson. Plus, the teacher can get a feel for how many words to introduce at a time, how quickly to add new words, and more.
Through Montessori teacher training, you can practice the three-period lesson in a safe environment. More importantly, you can get valuable feedback from experienced teachers. With the help of an instructor, you can tweak how you give the three-period lesson to be more effective.
Through a Montessori course, you can also practice role-playing this lesson with other future teachers and even students. Role-playing gives you important practice responding to students so that you can teach with confidence in the classroom.
Learn More About the Three-Period Lesson in Montessori Teacher Training
The three-period lesson is an important lesson in the Montessori classroom. During Montessori teacher training, you can learn how to present this lesson using Montessori materials. For example, with the brown stair or red rods, several lessons are usually given before students do the three-period lesson. Montessori often focused on the hands-on materials first before introducing vocabulary. Through a Montessori course, you’ll learn the ideal moment to use the three-period lesson.
In addition to the three-period lesson, there are many other teaching tools and strategies. From forming the characteristics as a Montessori teacher to classroom management, you’ll gain the skills you need to become a skilled educator.
Are you ready to master the three-period lesson? Learn about this concept and other important Montessori principles with our online Montessori courses. With our Montessori courses, you’ll get personalized attention to help you reach your full potential as an educator. Do you have questions? Please get in touch to learn more about our programs.
